Morning rushes leave little room for preparing nutritious breakfasts, yet starting your day with proper fuel remains crucial for sustained energy and focus. Enter the game-changing concept of jar breakfasts—portable, portion-controlled meals prepared ahead that transform hectic mornings into smooth sailing. These ingenious make-ahead options combine convenience with nutrition while saving precious morning minutes.
Let’s explore five versatile breakfast jar recipes that deliver both satisfaction and nourishment, no matter how pressed for time you might be.
Why Jar Breakfasts Deserve a Spot in Your Weekly Routine
Before diving into specific recipes, consider the compelling benefits of adopting this meal prep approach:
Time-Saving Magic
Mornings often unfold in a flurry of activity—showering, dressing, gathering belongings, perhaps managing children or pets. Jar breakfasts eliminate food preparation from this equation, freeing up valuable minutes when they matter most.
Portion Control Without Effort
Mason jars provide natural portion boundaries, helping maintain consistent serving sizes without measuring. This built-in portion guide proves especially helpful for anyone mindful of caloric intake or nutritional balance.
Reduced Food Waste
By preparing several breakfasts simultaneously using ingredients in their entirety, you’ll minimize the spoilage that often happens when foods sit unused in refrigerator corners.
Grab-and-Go Convenience
Whether eating at home or transporting breakfast to work, school, or the gym, jar meals travel exceptionally well. Their sealed design prevents leaks while maintaining freshness until you’re ready to eat.
Visual Motivation
Colorful layers of ingredients in clear glass create visual appeal that makes healthy eating more enticing. The aesthetic factor increases the likelihood you’ll actually consume your prepared meal rather than skipping breakfast or grabbing less nutritious alternatives.
Essential Equipment for Jar Breakfast Success
While the concept remains straightforward, having the right containers makes all the difference:
- Wide-mouth mason jars: The classic choice, available in various sizes (pint jars work well for most recipes)
- Leak-proof plastic containers: BPA-free alternatives for those concerned about glass breakage
- Silicone cups: For keeping certain ingredients separate until eating time
- Reusable spoons/forks: Compact utensils that fit in lunch bags for on-the-go consumption
Now, let’s explore five versatile jar breakfast formulations that satisfy different taste preferences and nutritional needs.
1. Overnight Oats: The Customizable Classic
Overnight oats have earned their popularity through unmatched versatility and ease. This no-cook method transforms ordinary oats into creamy, pudding-like breakfast with minimal effort.
The Base Formula
- ½ cup rolled oats (old-fashioned, not quick-cooking)
- ⅔ cup liquid (milk, plant-based milk, or yogurt thinned with water)
- 1 tablespoon chia seeds (optional but recommended for thickening)
- 1 teaspoon natural sweetener (honey, maple syrup, or mashed banana)
- Pinch of salt (enhances flavor significantly)
The Process
- Combine all base ingredients in your jar
- Seal tightly and shake until well mixed
- Refrigerate overnight or at least 6 hours
- Top with fresh ingredients just before eating
Flavor Variations
- Berry Bliss: Add fresh or frozen berries, sliced almonds, and vanilla extract
- Apple Pie: Mix in diced apples, cinnamon, nutmeg, and chopped walnuts
- Chocolate Banana: Incorporate cocoa powder, sliced banana, and peanut butter
- Tropical Dream: Combine coconut milk, chopped mango, pineapple, and toasted coconut flakes
Storage Duration
Prepared overnight oats maintain quality for 3-5 days refrigerated, making them perfect for weekly prep sessions.
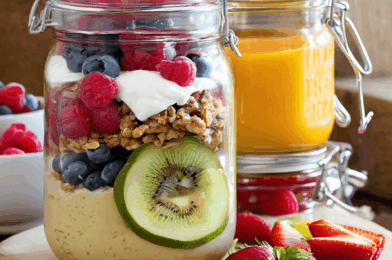
2. Protein-Packed Yogurt Parfaits: Layered Nutrition
Yogurt parfaits balance protein, fiber, and healthy fats for sustained energy throughout your morning. The key lies in strategic layering that maintains textural integrity until consumption time.
The Base Formula
- 1 cup Greek yogurt (provides substantial protein)
- ¼ cup granola or muesli
- ½ cup fresh fruit
- 1 tablespoon seeds or nuts
- Optional drizzle of honey or maple syrup
The Process
- Begin with a yogurt layer at the bottom
- Add fruit layer
- Continue alternating layers, finishing with crunchy elements
- Keep granola/nuts/seeds in separate container or top portion if eating within 24 hours
Flavor Variations
- Berry Medley: Mixed berries, vanilla yogurt, and almond granola
- Orchard Harvest: Diced apples and pears with cinnamon yogurt and walnut pieces
- Tropical Breeze: Pineapple chunks and sliced kiwi with coconut yogurt and macadamia nuts
- Mediterranean Morning: Plain yogurt, honey, chopped fresh figs, and pistachios
Storage Duration
For optimal texture, consume parfaits within 2-3 days, adding crunchy elements just before eating.
3. Chia Pudding Power: Omega-Rich Breakfast
Chia seeds create magical transformations when soaked in liquid, expanding to create tapioca-like puddings packed with omega-3 fatty acids, fiber, and plant protein.
The Base Formula
- 3 tablespoons chia seeds
- 1 cup liquid (milk, plant milk, or light coconut milk)
- ½ teaspoon vanilla extract
- 1 tablespoon natural sweetener
- Pinch of salt
The Process
- Whisk all ingredients thoroughly in a bowl (prevents clumping)
- Transfer mixture to jar
- Refrigerate 15 minutes, then shake or stir again to break up clumps
- Refrigerate overnight until set (at least 6 hours)
- Add toppings before serving
Flavor Variations
- Chocolate Indulgence: Add 1 tablespoon cocoa powder and top with banana slices
- Matcha Energy: Incorporate 1 teaspoon matcha powder and sliced kiwi
- Vanilla Spice: Add cinnamon, nutmeg, and vanilla bean paste with diced pears
- Pumpkin Pie: Mix in pumpkin puree, pumpkin spice, and top with pecans
Storage Duration
Chia puddings remain fresh for up to 5 days when refrigerated in sealed containers.
4. Savory Breakfast Jars: Beyond Sweet Options
While sweet breakfasts dominate jar meal territory, savory options offer welcome variety and often deliver more substantial protein content.
The Base Formula
- 1 cup pre-cooked grain (quinoa, brown rice, farro)
- 2-3 ounces protein source (hard-boiled eggs, beans, cooked bacon, smoked salmon)
- ¼ cup roasted or fresh vegetables
- 1-2 tablespoons sauce or dressing
- Fresh herbs or microgreens for finishing
The Process
- Layer ingredients starting with grains at bottom
- Add protein and vegetables in middle layers
- Keep dressing separate until serving time
- Microwave open jar for 30-60 seconds if warm breakfast desired
Flavor Variations
- Mediterranean: Quinoa, hard-boiled eggs, roasted red peppers, olives, and tzatziki
- Southwest: Brown rice, black beans, corn, avocado, and salsa
- Asian Fusion: Brown rice, edamame, grated carrot, cucumber, and miso-ginger dressing
- Protein Power: Quinoa, smoked salmon, cucumber, capers, and dill cream cheese
Storage Duration
Savory jars generally last 3-4 days refrigerated, with delicate ingredients added just before consuming.
5. Smoothie Freezer Packs: Blend-And-Go Brilliance
While technically requiring morning blending, smoothie freezer packs dramatically reduce preparation time while ensuring perfect proportions.
The Base Formula
- 1 cup frozen fruit
- 1 cup leafy greens (optional)
- 1 tablespoon protein source (nut butter, protein powder)
- 1 tablespoon seeds or flavor boosters
- Note: liquid added at blending time
The Process
- Layer all ingredients except liquid in mason jar
- Seal and freeze for up to 3 months
- Night before use, transfer jar to refrigerator to partially thaw
- Morning of, empty contents into blender with 1 cup liquid
- Blend until smooth, return to jar for transport if needed
Flavor Variations
- Green Machine: Spinach, banana, avocado, mint, and ground flaxseed
- Berry Protein: Mixed berries, vanilla protein powder, and almond butter
- Tropical Turmeric: Mango, pineapple, banana, ginger, and turmeric
- Chocolate Cherry: Frozen cherries, cocoa powder, banana, and hemp seeds
Storage Duration
Prepared smoothie packs remain viable for up to 3 months in the freezer.
Mastering the Jar Breakfast: Pro Tips for Success
To elevate your jar breakfast game further, consider these expert recommendations:
Strategic Layering
- Place wet ingredients away from elements that should remain dry
- Create barriers between moisture-sensitive ingredients using yogurt or nut butter
- Position dressings/sauces at very bottom or very top for easy mixing
Texture Preservation
- Store crunchy components separately when possible
- Lightly toast nuts/seeds before adding to extend crispness duration
- Choose firmer fruits that won’t break down quickly (berries over bananas)
Flavor Enhancement
- Toast grains before incorporating into savory jars
- Add spices to overnight components where flavors will bloom during resting time
- Remember that cold temperatures dull sweetness—slightly overseason refrigerated items
Portion Planning
- Standard pint jars (16oz) create substantial adult portions
- Half-pint jars work perfectly for smaller appetites or side portions
- Consider your personal hunger patterns when determining serving sizes
Meal Prep Workflow: Efficiency in Action
Transform a single 30-minute session into a week of breakfasts with this streamlined approach:
- Select 2-3 jar breakfast types for variety
- Prepare all common ingredients simultaneously
- Assembly-line construct multiple jars at once
- Label with contents and “eat by” dates
- Store properly in refrigerator or freezer
Conclusion: Morning Freedom Awaits
Jar breakfasts represent more than mere convenience—they embody intentional self-care during hectic mornings. By investing minimal time during calmer moments, you create pathways to nutritional success when willpower typically wanes.
Begin your jar breakfast journey with whichever recipe most appeals to your taste preferences and schedule demands. As you discover favorites, expand your repertoire to include diverse options that prevent breakfast boredom while maintaining the invaluable morning time savings.
The humble mason jar might just become your most powerful ally in achieving consistent, nourishing morning meals—no matter how challenging your schedule.